Pages

Saturday, December 7, 2013

Sour Cream Bowl Mosaic Bowl


I have been doing a few mosaic pieces lately & have had a really good time working on the different shape objects.  The other night we finished a sour cream bowl, and as I was rinsing it out to put in the recycle bin I thought to myself... "this would make a nice size flower pot".  I brought it to the shop the next morning, and tested some tile adhesive to cover up the lettering on the outside.  It seemed to cover all the ink printed on the outside of the plastic container just fine, so I grabbed my roll of faux pearls & glass gems and went to work.  I did not color the grout on this piece, but rather I left it white.  After leaving it alone for a few days, I decided I wanted to test out painting on grout!  I got my paint & brush out and went to work.  I am not wild about the color, but it seems to work, and even got darker after I sealed the grout.  I think this could be used either inside or out!  Not to bad for a sour cream bowl.


Here is another sour cream tub I used & put tiles on.   

Thursday, October 17, 2013

Bowling Ball Turned into a Garden Gazing Ball


Regular garden (pun is intended) variety bowling ball!  I got my trusty bright pink Valspar spray paint can out and proceeded to spray away!  It took two coats and some patience!  You can only paint half the ball at a time.  In our area the humidity is high, so it took me two days to get this ball painted and then dried! 


I stuff the two finger holes with paper and then put silicone glue on top of that & tried to get it as smooth as possible. Come to find out that once I grouted the ball, messy is not an issue!   I left the thumb hole for a solar light.


I began gluing my flat bottom marbles as close as I thought they needed to be.  I started at the bottom of the ball around the solar light hole and worked my way around from there.  I used approximately 100 flat bottom clear small marbles and 20 large flat bottom clear marbles.  Again this takes time as you can only do a section at a time.  I let my marbles dry over night.  


The silicone can ooze out from the marbles, because the grout will hide that. 


I used almost a whole tub of the Mosaics grout by Jennifer from Hobby Lobby.   Since I was going for the "Pink" theme I thought I would use some food coloring in my grout.  It worked out really well, or so I think is has (more on this later).  Follow the instructions on the grout label.  It is again tedious, but well worth the extra mixing and cleaning for the end product.  I used about 8 drops of food coloring per batch I made.  This food coloring ads liquid so remember to take that into account when mixing.  I added my coloring first & then I added the water!


I grouted the bowling ball per the instructions on the tub and found that it was really quite easy.  It turned my fingers pink from the food coloring, but that came right off after a few hand washing's.  Something I have learned since doing this ball while I was researching different/cheaper grouts when I read that... food coloring will not work.  I will say that the grout in this ball is getting lighter and lighter.  I am not sure if that is from it completely drying or if it is fading.  I am sure that once it sits in the sun it will fade.  I will be doing another gazing bowling ball this week for my Mother, and will be testing paint in my grout.  I will update if this is a good or bad thing!  I also learned that there are different kinds of grout for different projects!  


Voila!  
The pink gazing bowling ball.  I made this ball for our annual "Swing for a Cure" golf tournament.  Fourteen years of raising money for women in our County that cannot afford a Mammogram.  It was used in the raffle drawing & my good friend Dede Truitt took her home!  I can't wait to go visit her in Dede's garden!  


Items needed for the project:
1 Bowling ball. Mine came from my good friend Fay Burke!
1 can spray paint - your choice.
100 small flat bottom marbles - or more if you want a thinner grout line.
20 large flat bottom marbles.
1 Tube of Dap 100% silicone.
Paper for the finger holes.
1 tub of  Jennifer's Mosaic grout.
1 bottle of food coloring - optional at this point as I do not know if this will last or not!  
1 Solar light
1 old glass ashtray for a stand while I was working on the 
gazing ball.


Sunday, September 22, 2013

Coffee Can Makeover

I keep a coffee container on my counter next to my coffee pot, and each evening while making coffee for the morning I put the left over grinds in the container.  It is quite frankly very ugly and looks like a big zit on my counter.  Behold the magic of Black Spray Paint, Mod Podge & PicMonkey!


The container sprayed painted black!


Picture of The Bean when she was a puppy!


Picture of Lemon when she was a puppy with a stick in her mouth.


I got the the font off PicMonkey.com & it is called
Bleeding Cowboys!  


I turned this color picture into Black & White on 
PicMonkey.  I Mod Podge'd the whole container as 
the paint will chip off very easily if not.


My counter tops are black & I need/will take a better picture of my new container in its new spot.  No more big red zit on my counter!


Saturday, August 31, 2013

Latest projects


Getting ready for the fall craft show in West Columbia and Angleton.  These are some of my new creations.  

I have done a similar Blue Birds of happiness, but this one is a on different plate and pedestal color.  These are my most popular, and I love making them!  I am on the hunt for a stash of Red Bird glass made my Leo!


Love this Carnival glass chicken candy dish.  It has a chip in the lid, so I glued this chicken shut!  


This one is an upside down candy dish.  The vase I used was also cut, and it's made to look like the vase is going through the candy dish.  Unfortunately everything looks crooked in the picture, and on some angles it is crooked!  That is why I call all my glass work "Perfectly Imperfect"!


Small Dark Blue Bird on a dark blue bottom.  This one reminds me of my grandmother so much, because she loved blue! 


Blue Bird of Happiness with Baby Blue Bird of happiness!

Sunday, August 11, 2013

Garden Art Statue ~ Special build for my Cousin!

One of my most favorite builds so far!


Made this statue for my cousin Laura!  She loves the color Orange.  One day out on a junking trip I found this vase in a resale shop that was closing.  I did not know at the time that I would be using it for her, but knew that this vase was the bomb & I wanted to have it!  I had discussed with Laura a couple of times this year about what I wanted to do for her &  we even picked pieces out for the project.  I just never really got the "sha~bang" feeling when I started her build!  One day while in the shop and working on some other projects I pulled the yellow vase out.  I looked at it for a few days and that's when it hit me...BAM!  Laura's build was started.  I found the plates I wanted to use and the middle section I wanted to use!  That's when it hit me that I had a blue glass apple!  Laura is a retired school teacher, this apple was perfect for the top ... "sha~bang" there is blue on the vase!  Love it when a build comes together!  


At it's new home!


Friday, June 28, 2013

Mother's Day Gift 2013

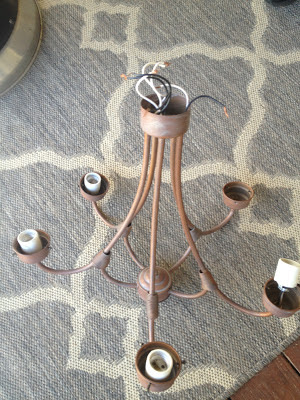
Last year while in a resale shop I found this old chandelier stuffed in a backroom.... on the top shelf.  Visions of Pinterest flashing through my head I knew I had to buy this old lamp and bring it back to life!  I think I actually got dizzy.  I got my haggle on and bought it for $5.00.... less the  glass shades.


 I took it home and stripped all the wire & ceramic light sockets out.  The sockets have been saved (hoarded) for a different project down the road!


I then took the fixture to my shop and placed it on the top shelf until I could figured out what I wanted to do....well I knew I wanted to make a bird feeder, but just did not have the full vision yet.  Color....additional pieces etc...


I was painting some night lights with my most favorite color in the whole wide world when it hit me that this was going to be the bird feeders color.  I thought to myself ....How great would those bright orange "Fire King" cups & sauces my sister sent me look next to this color.


I got the spray paint can out and started my project... Mothers Day was coming and as much as I wanted this for my back yard I knew this was   going to made for Mom! 


I added the cups & sauces.... then bling-ed it out with some faux pearls


Now all I needed to work on was "how I would hang this in her tree"?  I had saved (hoarded some rusty old pulley's from a mower) and knew this would be the perfect item to use to hold the feeder straight.  FYI that is Jack's hand in the photo!  


I purchased this old wooden pulley off Etsy a while back for a TV stand I wanted to build and hang on my back porch.  We could hang this pulley up in her big tree and it would work so she could raise and lower the feeder!  I guess I will just have to find another one....Darn the luck!
Jack worked his magic on the pulley and now I have a "thingy-ma-jig" that will hold the feeder straight.  I  feel I need to explain who Jack is... Jack is my brother in law as well as my go to handy man & fixer upper guy!  


This is the bottom of the thingy-ma-jig pulley holder!


Mom filling her feeder up!  FYI when it rains the bird seed has to be replaces as it gets all nasty and smelly!


Jack found a piece of 20" re-barb & bent a curl in the top.  He drove it into the ground so we could tie off the feeder with the camo nylon rope I purchased.


This is the pulley system, sorry the picture is so dark!


Close up!


Voila...
Happy Mothers Day 2013!
Gorgeous if I don't say so myself!

Sunday, May 12, 2013

Golf Shoe & Bag Planters

We were cleaning out a office at our shop the other day
 (making me a creating room, but that's a whole another
 story), and I came across three pairs of old golf shoes.  
Ding Ding Ding!!  At first I just pitched them in the trash 
pile, knowing in the back of my mind I would retrieve 
them like one of those poor hoarder people that cannot 
let anything go.  I had also been holding onto an old 
golf bag (hoarder!!), and I knew what I wanted to do!  


I drilled holes in the toe and bottom of the golf shoes for
 drainage & a hole in the heels so the golf shoes could 
easily be attached to the side of the barn.


I also drilled holes in the bottom of the golf bag for drainage.
  I then added empty water bottles to the golf bag so the bag
 would not weigh a ton & waste a bunch of good
soil, not to mention a great way to recycle!  
I filled the bag up about 3/4 the way to the top, 
cramming the bottles down as I went.


I traded some aloe & fern for some succulents with my
neighbor across the road. She grows succulents like crazy 
& I grow aloe and ferns like crazy.  I attached the golf 
shoes to the barn, and then used some old golf clubs to 
hold the bag in place.  I will see how they grow and 
continue this around the barn!  My vision was completed 
in just under one hour!


I know, I know I did not get the golf shoes level!  Urgh!!