Pages

Tuesday, June 2, 2015

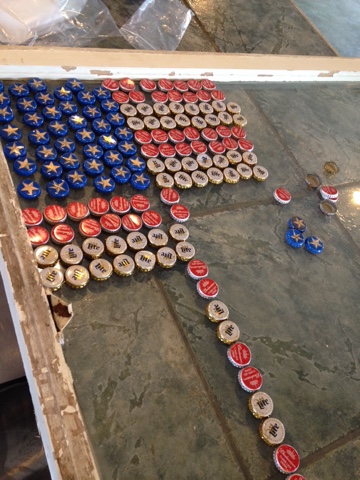
Beer Cap USA Flag


One old window frame


Beer caps sorted 


Played with the lay out


Got the layout that I wanted!


All American Beer Cap Old Glory!


I found the old window at the Angleton Market Days last year and scooped her up!  She is 39" X 34".  I sealed the glass with E-6000 glue, because I did not want any epoxy to leak out when I started that process (been there done that on my Mardi Gras piece last year).  Make sure you glue the corners, because your epoxy will try and seep out any crack it can!  I tested the seals by pouring a cup of water on the window! This also gave me another opportunity to clean the glass again.  

Next I started hitting a lot of the local Ice houses and Bars for beer caps (you can also find them on Ebay & Etsy if you not up for walking in bars and asking for caps).  I tried to use the least bent ones I could find...and a little tip...Let them dry out in your garage, not your house!  Phew they can smell for a few days!!  I used Lone Star Light caps for the Stars, Coors Light caps for the filler between the stars, Budweiser caps for the red strips, Miller Lite caps for the white stripes and then I used Bud Light caps for the border around the flag.  I had to play with it a lot in the beginning to see how she would lay out.  I think I pulled the caps off the glass four times before I found a layout that I liked.  I staggered the caps to give more room, and this also helps keep the rows straighter!  I use approximately 960 beer caps.  I got 13 stripes and 50 stars!  I also used tin snipes to cut some caps because I could not fit a full cap on some rows, this help fill in the gaps on the Bud Light Border. 

Okay...now I had the layout I wanted and took photos & made written notes so I would not forget how I placed the caps, because I was ready to start the epoxy process.  I found my epoxy at Amazon, its called Easy Cast Clear Casting Epoxy & I bought the gallon mixture (you will get two half gallon bottles, one is the mix & one is the hardener.  Mix half & half, and stir well).  I mixed one Solo Red cup with my epoxy mixture & spread it out as even as I could before placing each cap back on the window!  I used just a thin layer so the caps would sit and set.  I had plenty of time (1 1/2 hours) to set the caps before the epoxy started really setting.  Once I had all the caps in place I used a hair dryer (mine is a very heavy duty one that I use on golf clubs...not hair!!) to pull any bubbles out!  Some people like to use a torch which is fine, but it can scorch!  I let the piece dry over night before putting another layer of epoxy down.  Again I used the hair dryer to pull bubbles out of the epoxy!  If you get a bubble during the hardening process..not to worry..poke a hole in it and when you do your next layer it will fill in and you will not be able to see it at all!!

I am done!  Three layers of epoxy (one gallon total) and I think she came out looking great!  It is very heavy but that is okay!  


Supplies:
Favorite clear glue or caulk
960'ish beer caps
Tin snips
One gallon clear epoxy resin
One window frame, or frame of of your choosing
One sign that says:
 "Do Not Touch"
&
A little time!!


Saturday, May 2, 2015

Beer Bottle Cap Wind Chimes - Hangover Series


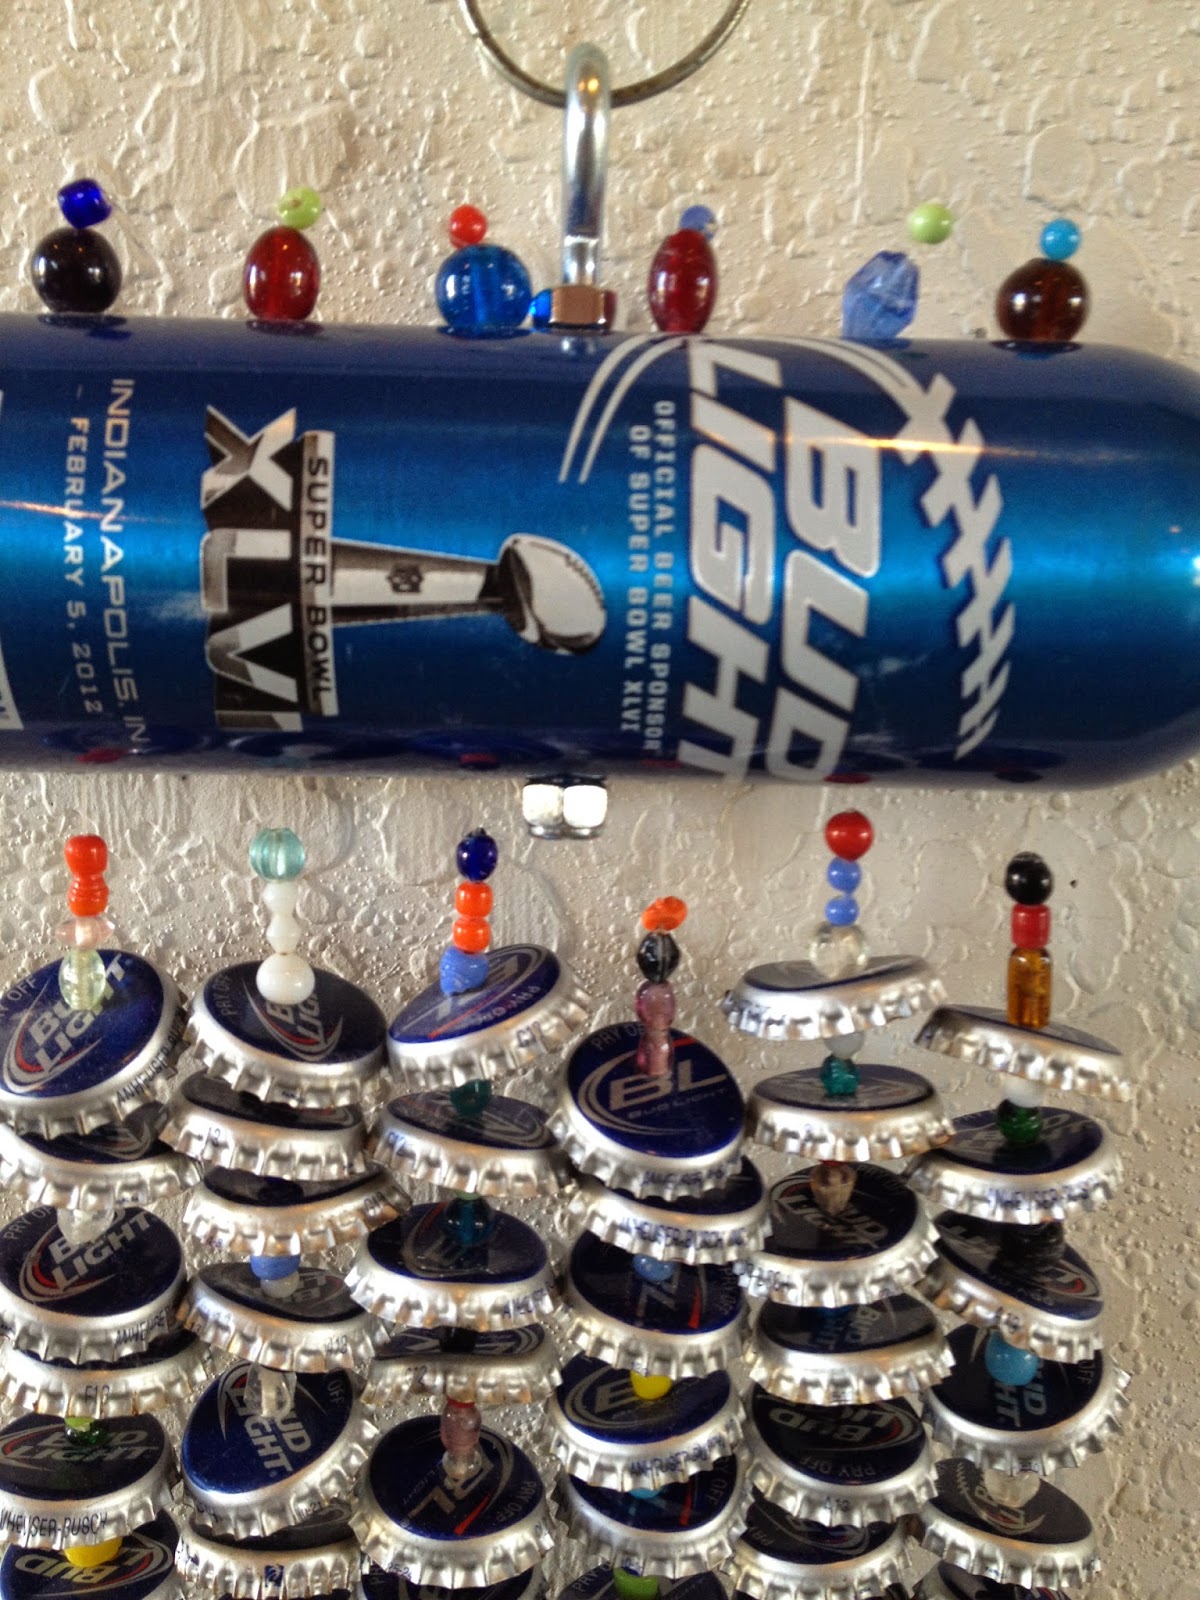
I always find odds and ends at the beach every Summer & I usually just throw them in a glass jar I have on the patio, or in the garage to dry out.  Couple years ago I made a wind chime with some caps I had collected, and I used a "Super Bowl" Aluminum Bud Light bottle.  I called it the "Hangover"...They make very little noise & and of course made from beer caps!    Recently I decided I wanted to make some more!  So I hit my local Ice House once a week or so & they graciously give me enough to work with (I leave a tip of course)!  I now have a whole series of "Hangover" wind chimes.  Here are some photos and their history.


This one is called "Beach Spoon".  I found the spoon on the beach two years ago!  Jack helped me drill the holes in the spoon & I set out stringing beads and caps!  I used glass beads on this one.  When hanging in a window the light reflects the glass and gives it a nice sparkle of color.  This on is 21" long and hangs 27" with the strap.  She is very heavy!!


This one is called "Giant Super Bowl Hangover #2"  I had cut the bottom of this bottle back when I was making "Giant Super Bowl Hangover" and did not like the results...so I put it up and forgot about it!  I ran across the aluminum bottle the other day and thought....hmmm let me think about this!  I found a fan cap my Mom had given me for what ever reason & now I found myself holding these two pieces!  First I spray painted the fan cap a baby-ish blue...YUK!  I pulled the silver out and we were in business.  This one also has the glass beads between the caps.  Explanation for the name "Giant Super Bowl Hangover" is explained below!!


"Drift Wood Micky"  I picked this piece of wood up last year at the beach and stuck it in the garage to dry!  Last week I ran across it and knew what I wanted to do!  I used Michelob Ultra caps, thus the name Micky!  Michelob Ultra caps rust really badly by the way!!  Not sure why, but if you are working with this product..Keep that in the back of your mind!!  I also used glass beads between the caps. I found an old pukka shell necklace, not sure if they are plastic or real, but I used them to hold the fishing line at the top of the drift wood.  I was going to use leather as a strap (and I drilled the holes for that) but I decided I like how the fishing line held the wind chime.  Now I need to either make two more strands or just leave it for a leather strap later.  


"Big Bud Red"  I wanted to make the girls at the Ice House a wind chime, since they collect the caps for me!  I came across this Budweiser Aluminum bottle the other day on the golf course and quickly grab it before it hit the recycle bin.  I love the red!  "Big Red Bud" has three strands of caps and glass beads! She is a beauty and probably my favorite!  I just love red!


"Key to my heart #2"  I love Heineken beer!  It really is about the only beer I will drink!  I came across two red pepper aluminum lids that I had saved (hoarded, but that's another story...hee hee).  I dug out the hein-y caps and went to work.  I had a stash of keys that I used on the bottom of each strand.  I also used glass beads between the caps on this project.  This one has four strands and "Key to My Heart #1" only has two strands of caps and beads.


"Key to My Heart #2" better picture.


"Giant Super Bowl Hangover"  The first beer cap wind chime I made! Read the story here.... On my Blod dated February 2012.   lemonbeanandthings.blogspot.com/2012/02/bud-light-wind-chime-homage-to-super.html
 I used plastic beads on this one.


"Key to My Heart #1" its just has two strands!


"Giant Super Bowl Hangover#2"  This shot is the lid.  I drilled the holes in the lid and scratched it, so I had to spray paint it!  I think the silver worked out very well!  Still trying to get the ugly baby blue out from my finger nails!  Urghh..


"Drift Wood Micky" This shot is of the beads and caps.  I have trimmed the extra fishing line!  Again you can see how rusty the Michelob Ultra caps are!  But hey...Rust is the new gold!!


"Big Red Bud" another shot of the caps


"Beach Spoon"  Shot of the top.


"Key to My Heart #2" shot of the keys.


"Key to My Heart #1"  the top of the wind chime.  


"Giant Super Bowl Hangover" Close up of the beads!


I do not recommend any of my wind chimes be placed out side!  They deserve a spot in a window or in a "Man-Cave"! I would be so afraid the wind would ruin them, not to mention again about the rust!  Thanks for looking & thanks for "Pinning"!  Now.... off to find some more stuff!!   


Friday, February 20, 2015

I have been slacking on my blogging!!


 I have been busy since last August!  
Busy with "Normal" work & "Life"!  
I have done some projects however since last year
and here a just a few!


Milk White Glass Bird Feeder with a bud vase as the body &
a Votive as its feet!  Fun piece.  
I have started using All Thread and 
locking nuts with my pieces.  
I drill very carefully with a diamond 
drill bit and then just cut the All Thread accordingly!  
I used a 1/4" drill bit and All Thread.  
I also started using Neoprene washers that I placed 
between the glass and locking nuts.  
This helps not bind the glass so bad when you tighten down the nuts. 
I found out quickly these can be expensive and hard to find.  
I started making my own "washers" out of felt and a Punch Set!  
I have also used thick plastic!  
To finish off the piece I also added a drop of epoxy on the nuts, 
just to give them a little more strength.  


This is a Devil Egg Plate with a old piece of glass 
from a ceiling fan and then a glass pear!  
You can see the Neoprene washers in this photo.


I also updated my Bud Light Wind chime.  
I had a bag ofscrap beads and decided to string 
the beads between the caps!
I think it gives it a little more bling bling color!!  
I also added an eye hook bold for easier hanging!


I also made some Heineken Wind chimes.  I used Crush Red Pepper Caps for the tops.  I also used the scrap beads with these, and another eye hook for easy hanging!  
Word to wise....
Never throw away beads!!  They have wonderful uses!!


These are some beer cap necklaces I made.  I used some Shiner Bock beer caps and then places Millefiori, stones & Beads in the caps.  I used epoxy resin to fill in the cap.  I had purchased a bracelet at a local fundraiser this past year with the thoughts that the beads were super cool & usable in some other project down the road!  I was right, as they finished of these with a little Bling Bling!  they are not straight and some of the beads are crooked, but I think that adds to the appeal of them!  Helloooo..They are beer cap necklaces..lol!!


This Spring I plan on redoing my tire project 
from a few years ago!  I am going to make
a vegetable garden this time around!  See you then!!


Phyllis 
Lemon & The Bean